Thursday, 15 June 2017

Final project evaluation

Through out this project on corruption and decay my work was successful. My sketchbook was filled with many aspects of corruption and decay including political corruption, decay in nature and man made objects which I photographed as well as looking into what corrupted me and others like drugs, cigarettes, alcohol, money, time and will power.my final pieces went very well after a few things I had to fix such as the wooden crate lats that fell apart so I used a glue gun to secure them as well as nails. When burning my pieces to make them look decayed and corrupt the glue would melt so I used rusted nails to secure them, this turned out to be a great addition to my pieces as it gave it an even more decayed look. My spray paint piece looked a little rough, too rough so to add detail I had a screen made to print on the fine line details. My own learning was very good in my opinion as I gathered all my research, created all my ideas as well as looked at artists related to my project to bring together my pieces to be on display at the show to meet my deadline and achieve what I set out to create.

Through my project I have had advice  from my tutors and peers. For example with help on deciding what to do for my final pieces which my tutor helped me with showing me different artists and sculptors to create my shattered shed piece influenced by Cornelia Parkers exploding shed. My peers have helped me with my pieces with giving me feed back on what they think of them and how I could improve them like my spray paint piece and how it would give more detail with a screen print over it.

Through this project I have achieved a lot more and progressed with my art work. I've improved with my knowledge of 3D and work in 3D aspects with making Wodehouse look old and battered with wax and burning as well as spray painting and screen printing, expanding my knowledge in the field of art and design and gaining skills to add to my existing skills. These skills I will take on with me to my work in university and beyond in my career.

Through my interviews at universities I have looked back and noted that I need to be more relaxed and prepare my work to talk about it more confidently and to show how dedicated I am to art and design and show how much I want to achieve with my passion for art and design as well.

Tuesday, 13 June 2017

Small wooden canvas piece

This piece will be a smaller version of my large main piece which I have created in the same way using the heat gun and polish to make it look like it is decaying and corrupt.
 

Final piece on corruption- shed wall

This piece was based off the influence from the piece by Cornelia Parker who blew up a shed and took so photo as it exploded which then she pieced back together in the way it was in mid explosion. This to me resembled decay and so I created a large shape out of wooden crate lats Which I then pieced together some broken and some full to give it that shattered decaying look.
I then used a flame thrower to give it a more decayed look with burning it. I then created small pieces resembling corruption from all aspects such as politics, harmony and piece as well as photos I had taken myself. I then glued these on and used a heat gun to to add in finer burnt detail. I then nailed these on to make sure they were secure with rusty nails from the crates as well to give it a more rugged look. To finish I used some polish to look like mud and dirt to give it a more decaying and corrupt look.
This will be my main show piece to show my theme of decay and corruption and all the aspects I have looked into.
 

Corrupt police officer spray painting


This is one of my 3 final show pieces. I have used 3 colours green white and black like my original drawing and created 4 stencils, each representing a different part of the drawing.
Before doing my final spray painting I have done some test pieces which turned out pretty well so I will frame these and put them up at my show.
Now using the spray paint I've created my piece. In my opinion it looks less detailed than I wanted but has that corrupt and decaying look, now I will use a screen to paint on the fine liner details and then it will be complete to be put up for my show  
 

Thursday, 25 May 2017

Corrupt police officer piece

One of my show pieces will be a spray paint piece of the corrupt police officer/ swat officer I have drawn. This will be adding to the corruption in society side of my project with graffiti and how people view it with being art or discrimination of natural beauty.
For the 1st design I drew it up in my sketch book using 2B pencil and then used water colour, using colours such as black, green and grey to show corruption and decay with the black and green to show the pollution from the gas and showing the corrupt look in the swat officers eyes. Then I added the finishing lines with a fine liner.


Artist research - Cornelia Parker

I've only looked into one piece in particular of Cornelia Parkers and that is the piece which was blown up to be created. The piece that was a blown up shed which she blew up and took a picture of which then helped her recreate the exploded shed in a gallery. This piece resembles corruption and decay with the corruption being the blowing up of the shed and the decaying of the wood as it shatters, cracks and burns away. This has been the main influence on my show piece of corruption with the burning of the pieces of my collage and the decaying of the wood and shattered pieces.

Image result for cornelia parker

Artist research - Rouschenberg

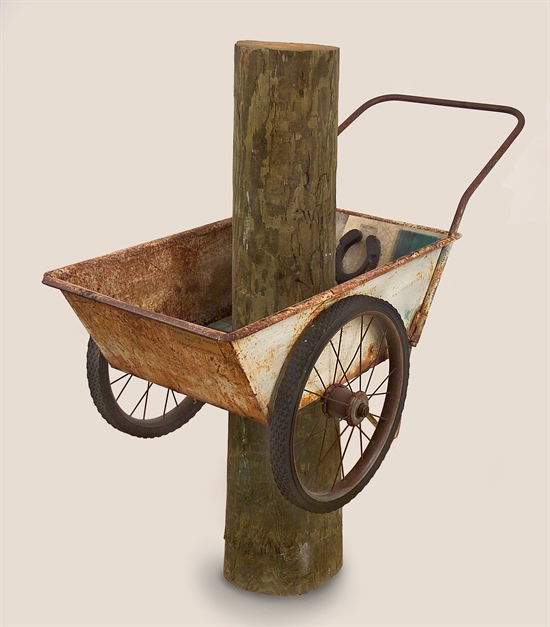
I've also looked into the artist Rauschenberg and how he used old decaying items to create his sculptures when he forts started out, using rusty chairs, wheel barrows, any metal along with rotting wood and other pieces which he's used to become the visionary artist we see him as today. His work has influenced my final piece with rotting wood burning it as well as burnt fabric and other items to create a collage on corruption and decay looking at all aspects like Rauschenberg did with his collages on the views through the 60s. 

Image result for rauschenberg sculpture
Related image

Artist research - John Holcroft

Through this project I've looked into the corruption in government and politics a little which lead me to the artist John Holcroft who is an illustrator looking into how the money and governments around the world are corrupt and only want to help them selves with images on a cigarette burning away with money acting as the tobacco and others making us look at how the people in charge will always blame those below them. His work is very political with his influence on the work he has produced. For me it shows how the corruption of our governments and the way our world is run.

Image result for john holcroft illustrationsImage result for john holcroft illustrations

Artist research - Pez

Looking into artists through my project I've looked at the French artist PEZ looking at his fine detailed pieces on the decaying of buildings and characters he creates with pencil and fine liners. This helped me to look into and recreate a piece of my own design on a corrupt police officer with a gas mask to show how he only cares about himself even though his job is to serve and protect those in need.

Image result for pez artistImage result for pez artistImage result for pez artist

Artist research - Kwangho Shin

Through this project I've looked at artists such as Kwangho shin and his work looking into the darkness of people's souls making a portrait with acrylic paint of a rough silhouette of a face adding little colour like reds pinks oranges and blues to brighten up his pieces and from my view adding a little bit of good to the darkened soul showing there is still good in the person. For my research I have recreated his pieces but with oil pastels to get a rougher effect on the paper. This artist I enjoyed looking at as it really sparked my project off and how I could look into the corruption of people.

Image result for kwangho shin
Image result for kwangho shin charcoal

Research on material

In this project on corruption and decay I've looked into aspects of decay in metal and wood with burning and general decay over time how the wood bends and becomes frail as well as it burning away losing its colour and blackening looking corrupt and taken a new form along with the burning of cloth as it shrinks and crumples up.

Thursday, 2 March 2017

FMP Corruption / Decay

For my FMP ( final major project ) I have chosen the subject of Corruption with a range of paths I can follow with the word corruption I can produce a range of pieces going into 3D work as well as drawing and painting I aim to create a range of work to show my view on the subject.

The word corruption also links in with decay, delinquency, crime, fraud... so I can use this to my advantage with my love for looking into the dark and gritty parts of the world and my surroundings looking at the finer detail in everything creating pieces that will really capture people's attention with my work.

I aim to make this project my most detailed yet looking into as many aspects of corruption and decay I can.

Wednesday, 8 February 2017

Day 6 of my 3D memories model

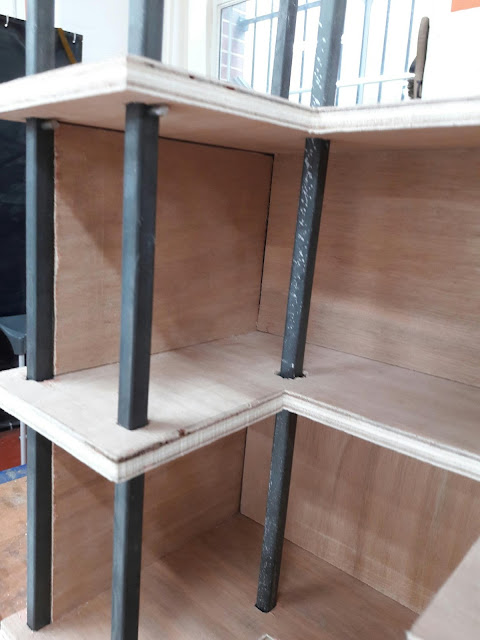
Here I have used my class mate and my idea and cut the panels down and slot them in between the metal support rods. Now I carefully sanded them down making sure they would slot in and not be sanded down too much that they would fall out.

Now that the side panels are sorted now I am going to use "mod podge matte" to transfer my images onto wood this way my structure looks better and there aren't glue stains and ruined photos with creases all over my structure.

Day 5 of my 3D memories model

Here I measured out the side panels for my structure, this I did on one large sheet making sure I didn't waste material as well as making it easier and quicker to cut out all the pieces. Once the pieces were cut out I sanded them down so they'd fit perfectly.

Unfortunately I sanded the edges a little too much and they fell out so me and my class mate came up with the idea of cutting them down to fit in between the metal rods, this made the structure look better and the pieces would fit better this way showing off more of the structure in the process.

Memories evaluation

My project on memories was based on my own memories and how some may have faded like some parts of the town I live in as it changes in recent years certain aspects will be forgotten. Through the project my research and development of my ideas went well as it helped me decide on what I would do for my final piece. Through the course of the project I had to amend and change aspects of my final piece as some parts didn't work so we had to swap them out and change certain aspects such as adding in side panels and standing the structure up with metal rods. My own learning I find was very productive as it helped me choose how the project would pan out. I did meet the deadline and my final piece was to a good standard but I feel I could have made my final piece better by adding more features to it.

Through out my project my peers and tutors have helped me particularly with finding artists and helping me progress with my final piece, helping me with my final piece making it more efficient in what I wanted to do and where I wanted to go with it.

My progress in this project has opened my eyes to how much work I can achieve and complete with the time I am given as well as progress with my ideas over the course of the project to give a well presented final piece. From this project I can see how I can progress with my next project with techniques I've learned in the 3D workshop with the materials I've used. In my next project I will take 3D aspects n use them in my next project, my FMP such as metal work and structural work.

To prepare for my interviews I have mounted and used my portfolio to present my work in a professional manor. I do need to work on my communication in what I want to say and to help me put across my points in my interviews. These points I need to revise and look at will help me with further progression situations.

Photo memories

Monday, 2 January 2017

Day 4 of my 3D memories model

Now that my floors and my steal rods have been cut I need to drill a hole through the steal at 3 points for each floor so the metal rod I will cut can slide through to hold the floor at a certain level.

To cut the metal rod I used a hack saw and cut out 24 pieces at 2cm a piece so it's long enough to hold up the floor when put through the steal beam but still small enough to be hidden.

Day 3 of my 3D memories model

After drilling the holes and filing them down it was now time to cut down the steal rod and file them down so they fit through the holes in the 3 floor I cut out earlier.

Shown in the pictures below I'm using a hack saw to cut the rod to the length I want it to be (45 cm) so I have 8 rods to hold my model up.

Now to file them down on each end to fit through the holes which I've cut and filed down so they slide through perfectly.

day 2 of my 3D memories model


 now that my floors have been cut out on the band saw to get a precise and clean cut now to measure up in the corners and how far in the holes for the steal rods have to go. If too far out the wood will crack and if they are too far in then I won't have enough room to place any items.


Once marked out I then take the wood to the drill where I then drill the centre, to then make it a larger and square hole i then used a square file to finish off the hole to make each hole the right size and shape.


day one of my 3D memories model

here is the building half demolished that I am basing my final 3D piece on. the building is an old council set of offices that have been knocked down to make way for a temporary market. 
 here shows the image of how much everything would cost plus how we would measure out everything along with the measurements for each floor and the measurements for each length of steal that would be used to stand the building up and separate each floor.


from these photos I have shown how I've measured out all the floors, a total of 3 floors each cut down to size on the band saw, these were all cut to the same measurements so they would line up and stand straight when the steal rods would be put through to make it stand on its own.